Guava(Hisar Safeda)


Guava (Psidium guajava L.)
- The most important tropical and subtropical fruits, Fresh guava is a rich source of Vitamin C and also contains appreciable amounts of niacin, calcium, phosphorus, and iron, seeds of guava are potential sources of pectin and oil.
- Guava is a perishable fruit and is susceptible to bruising and mechanical injuries.
- Hisar Safeda Guava is a very sweet and tasty medium-sized guava.
- Weight is approximately 150gm or greater.
- When fully ripe, the color changes from deep green to light yellow.
- Either grafted or clone varieties are available.
- This variety can be stored for a long time and sold in a larger market for a higher price or exported. And, produce higher yields as compared to other varieties.
FLORAL BIOLOGY
- The floral biology of guava cultivars Hisar Safeda was studied at TFPCL farm. Two flowering seasons, viz., spring (April-May) and autumn (August-September) were observed in all the guava cultivars under semi-arid conditions of Haryana.
- The flowering duration varied from 33-41 days in spring to 38-45 days in autumn.
- The floral bud passed through eight arbitrary stages from dormant to the fully opened stage and took 36-42 days to complete all the stages in the rainy and winter season respectively.
- The seventh stage of floral bud was most suitable for emasculation. Cv. Hisar Safeda bore flower solitary or in cymes of 2-3 flowers on the current season growth in the axils of the leaves.
- It is a cross between Allahabad Safeda and seedless sweet white Indonesian guava, Developed at CSS HAU, Hisar.
- Plants have upright growth habits with compact crowns.
- Fruits are round with a smooth surface, creamy white pulp with a few soft seeds with high TSS (12-13Degree Brix).
- Optimum Spacing 3*3Meter and 6*6 Meter
Seedless Cucumber
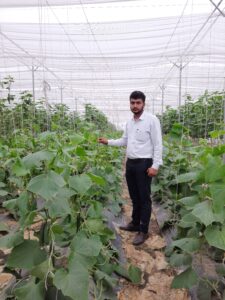
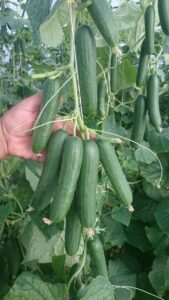
Seedless Cucumber hybrid seeds produce vigorous plants
Features:
- High yields: Seedless Cucumber is a high-yielding cucumber variety that can produce up to 2-3 fruits per plant under ideal conditions.
- Disease resistance: This variety is resistant to several common cucumber diseases, including powdery mildew, downy mildew, and anthracnose.
- Early maturity: Seedless Cucumber matures in about 50-55 days after planting, which is earlier than many other cucumber varieties.
- Excellent fruit quality: The cucumbers are dark green, shiny, and have a crisp, delicious flavor. They are perfect for slicing, salads, and pickling.
- Open plant type: The open plant type allows for good air circulation and light penetration, which can help reduce the risk of disease.
- Suitable for protected cultivation: Seedless Cucumber can be grown in greenhouses, tunnels, or other protected environments.
Benefits:
- Increased profits: The high yields and disease resistance of Seedless Cucumber can help growers to increase their profits.
- Reduced risk of crop failure: The disease resistance of this variety can help to reduce the risk of crop failure.
- Earlier harvest: The early maturity of Seedless Cucumbers means that growers can get their cucumbers to market sooner.
- High-quality product: The excellent fruit quality of this variety will appeal to consumers and help growers get a premium price for their cucumbers.
- Less maintenance: The open plant type of Seedless Cucumber requires less maintenance than other cucumber varieties.
- Year-round production: Seedless Cucumber can be grown year-round in protected environments.
Land Preparation:
- Loosen the Soil: Break up the ground 20-25 cm (about 9.84 in) deep using a spade, rototiller, or tractor. This aeration improves drainage, facilitates root growth, and incorporates organic matter.
- Strike the Right Balance: Cucumbers thrive in slightly acidic soil with a pH of 6.0-7.0. Test your soil’s pH and adjust accordingly. Use lime to raise pH and elemental sulfur to lower it.
- Organic Boost: Enrich the soil with well-rotted manure or compost at a rate of 2-4 kg/m². This increases organic matter content, enhances drainage, and provides essential nutrients.
- Fertilizing for Success: Consider adding a balanced fertilizer like 10-10-10 NPK at a rate of 1 kg/100 m (about 328.08 ft) ² before planting. This provides additional nutrients for optimal growth.
- Create Mounds: Build raised beds 15-30 cm (about 11.81 in) high using a mixture of soil, compost, and aged manure. Ensure good drainage holes are present.
- Refine the Surface: Rake the soil to a fine tilth, removing any large clods or debris. This creates a smooth and welcoming environment for Seedless Cucumber seeds.
- Furrows or Hills: Depending on your planting method, form planting hills or furrows. Ensure proper drainage by making them slightly elevated.
- Mulch Magic: Cover the prepared bed with a thin layer of mulch (straw, hay, or wood chips). This suppresses weeds, retains moisture, and regulates soil temperature, creating a favorable microclimate for Seedless Cucumbers.
Sowing
When sowing the Seedless Cucumber crop, the process depends on several factors, including your climate, preferred method, and variety. Here’s a breakdown of the two main options:
Direct Sowing:
- Suitable for: Warmer climates with consistent soil temperatures above 68°F (20°C) after the last frost.
- Timing: Sow Seedless Cucumber seeds directly outdoors when the soil has warmed sufficiently, typically late spring or early summer. Ensure no risk of frost remains.
- Method: Make planting holes or furrows about 1 inch deep and spaced according to cucumber seeds (typically 12-18 inches apart). Sow 2-3 seeds per hole and cover lightly with soil. Water gently.
Starting Seeds Indoors:
- Suitable for: Colder climates or early harvests.
- Timing: Start seeds indoors 4-6 weeks (about 1 and a half months) before the last frost date.
- Method: Use individual pots or seed trays filled with seed starting mix. Sow 1-2 seeds per pot, 1/2 inch deep. Place in a warm location (70-80°F) with bright light. Water regularly keeps the soil moist but not soggy. Once seedlings have developed true leaves, thin to one strongest plant per pot. Harden off seedlings for a week before transplanting outdoors when soil temperatures are warm, and all risk of frost has passed.
Transplanting:
Preparing the Soil:
Choose a sunny location with well-drained soil.
- Amend the soil with organic matter like compost or aged manure to improve drainage and nutrient content.
- Dig planting holes twice the diameter of the seedling pots, spaced according to Seedless Cucumber seedlings (typically 12-18 inches apart).
Transplanting Technique:
- Gently remove seedlings from pots without disturbing the roots.
- Place the seedling in the planting hole at the same depth it was in the pot.
- Fill the hole with soil and gently firm it around the base of the plant.
- Water generously settles the soil and eliminates air pockets.
Aftercare:
- Water regularly, especially during hot weather, to keep the soil moist but not soggy.
- Mulch around the plants to retain moisture, suppress weeds, and regulate soil temperature.
- Provide support for vining varieties using poles, trellises, or netting.
- Monitor pests and diseases and take appropriate action if necessary.
Harvesting:
- Pickling Seedless Cucumber is usually harvested earlier than slicing varieties when they are smaller and firmer. Their skin should be bumpy, and the blossom end should be closed.
- Slicing Seedless Cucumber typically requires more time to reach full size and have smoother skin with an open blossom end.
- Use sharp pruners or a knife to cut the cucumber stem, leaving about 1 inch of stem attached to the vine. Avoid pulling or twisting, as this can damage the plant.
- Harvest cucumbers regularly, ideally every 1-2 days, to encourage continuous fruit production.
- Avoid harvesting Seedless Cucumber in the heat of the day, as they may be wilted or sunburned. Early morning or evening are ideal times.
Storage:
- Crisper drawer: This is the best place for most cucumbers. Wrap individual Seedless Cucumbers in a damp paper towel or place them in a breathable container to maintain moisture but prevent sweating. Avoid plastic bags, as they can trap moisture and accelerate spoiling.
- Zip-top bags: For longer storage (up to 1-2 weeks), place each cucumber in a separate zip-top bag with a metal spoon inside. The spoon absorbs ethylene gas, which hastens ripening. Remove any condensation that forms in the bag.
- Cool pantry: If your pantry stays cool and dark, you can store unwashed cucumbers there for a few days. Place them on a paper towel to absorb any excess moisture.
Tomato


Key Features:
- High Yield: Get ready for an abundance of tomatoes! These plants produce heavy clusters of medium-sized (80-90g) fruits throughout the season.
- Flat Round Shape: Enjoy perfectly shaped tomatoes ideal for slicing, salads, and canning. Their uniform size makes them visually appealing and perfect for market fresh options.
- Good Fruit Firmness: Bite into the difference! NS 4266 tomatoes resist cracking and have a satisfyingly firm texture, even in hot weather.
- Strong Plant Vigour: Witness vigorous growth with sturdy stems and disease resistance. These plants thrive in a variety of climates and soil conditions.
- Medium Maturity: Harvest your delicious tomatoes within a moderate timeframe, allowing you to enjoy them sooner while maintaining excellent shelf life.
- Sowing Season: Perfect for planting from August to October in tropical regions like India.
- Tomatoes need well-drained, fertile soil with a neutral pH (6.5-7.5).
- Test your soil and adjust pH with lime or sulfur if needed.
- Add organic matter like compost for better fertility and drainage.
- Deep till (10-12 inches) to loosen the soil for root growth, use a rototiller or spade.
- Create furrows 1-2 inches deep, spaced 2-4 feet apart for row planting.
- Water the area thoroughly a few days before planting.
- Lightly rake the soil surface for a smooth planting bed.
- Add balanced fertilizer as per package instructions.
- Use black plastic mulch to warm the soil and suppress weeds.
- For raised beds, ensure they are at least 12 inches deep with a well-draining soil mix.
- Fill your seedling trays or pots with excellent quality seedling compost.
- Aim for spacing of NS 4266 Tomato Seeds are about 2-3 cm (about 1.18 in) apart & lightly cover the seeds with a thin layer of compost. This should be about 0.5 cm (about 0.2 in) thick.
- Cover the NS 4266 Tomato seedlings with transparent plastic wrap or a humidity dome to maintain moisture.
- When the NS 4266 Tomato seedlings have emerged and developed their first true leaves, it is time to thin them out. This means removing weaker seedlings to give the stronger ones more space to grow. Use scissors to snip off the weaker seedlings at the base.
- Continue to care for your tomato seedlings until they are ready to be transplanted outdoors. Depending on the variety and your climate, this will be around 6-8 weeks (about 2 months) after sowing.
- Dig planting holes: Dig holes slightly deeper and wider than the containers your seedlings are currently in. Space the holes according to the recommended spacing for NS 4266 Tomato Seeds variety, usually 18-24 inches apart.
- Removing seedlings: Gently remove the seedlings from their containers. Use a spoon or trowel to loosen the soil around the roots if necessary.
- Planting: Carefully place each seedling in a prepared hole, burying it slightly deeper than it was in its container. This encourages strong root development.
- Watering: Water each seedling deeply immediately after planting. Continue to water regularly, especially during dry periods.
- Mulching: Apply a layer of organic mulch, such as straw or wood chips, around the base of your plants. This helps retain moisture, suppress weeds, and regulate soil temperature.
- Determinate tomatoes: These compact plants typically grow 3-5 feet tall and can be spaced closer together than indeterminate varieties. Aim for 2-3 feet apart within rows and 3-4 feet between rows.
- Indeterminate tomatoes: These vining plants can grow 6-12 feet tall and require more space to sprawl. Space them 3-4 feet apart within rows and 4-5 feet between rows.
- Cherry tomatoes: These small-fruited plants can be planted closer together than larger-fruited tomatoes. Aim for 18-24 inches apart within rows and 3-4 feet between rows.
- Ripeness: Harvest NS 4266 Tomato Seeds when they are fully colored and slightly soft to the touch. Avoid picking green tomatoes, as they will not ripen properly.
- Timing: Harvest NS 4266 Tomato Seeds in the cool morning hours to avoid sun damage.
- Methods: Use sharp pruning shears or a knife to remove the tomatoes from the vine. Leave a small stem attached to help prevent rot.
- Frequency: Pick tomatoes regularly to encourage further fruit production.
- Light: Keep NS 4266 Tomatoes out of direct sunlight, avoid storing them in the refrigerator.
- Store NS 4266 Tomato at room temperature (60-70°F) for the best flavor.
- Duration: Ripe tomatoes can be stored at room temperature for 3-5 days. If you have a surplus, you can extend their shelf life by storing them in the refrigerator for up to a week.
- Green tomatoes: If you have a late frost and your Tomatoes are still green, you can harvest them and ripen them indoors. Place them in a paper bag at room temperature out of direct sunlight. Check them regularly and remove any that are soft or rotten. Green tomatoes will typically ripen within 1-2 weeks.